Enable Javascript in Photoshop 2022 above
- to avoid warning pop dialog, you need to create a file at
%appdata%\Adobe\Adobe Photoshop 2022\Adobe Photoshop 2022 Settings\PSUserConfig.txt
%appdata%\Adobe\Adobe Photoshop 2022\Adobe Photoshop 2022 Settings\PSUserConfig
at path:
%appdata%\Adobe\Adobe Photoshop 2022\Adobe Photoshop 2022 Settings\
- with content inside PSUserConfig.txt and also PSUserConfig (no ext in case for win10) (also enable ps use wacom instead ink code here)
WarnRunningScripts 0
UseSystemStylus 0
- more config text cmd here: https://helpx.adobe.com/sg/photoshop/kb/enable-optional-extensions-photoshop-cc.html
Javascript Version and Compatibility
- JS ES3 (1999): photoshop js based on.
- JS ES4
- JS ES5: .trim()
- JS ES6 (2015): let const, arrow
- JS 2016: array.includes()
- JS 2017: string padding
- JS 2018:
- note
- function with default parameter:
function hex2rgb(hex, asList) {
    asList = asList || 0; // default not as list but as dict
}
- startswith support
- check JS version: $.about()
- ref:
My Photoshop Script
- From time to time, I find I need something that can be repeated in Photoshop, that is why I decide to post some photoshop javascripts here. Most of them are very useful
- Code Generator: script for building variable code/coupon code in Photoshop
Photoshop Scripting and Automation
- Photoshop script guide can be found in application directory like
C:\Program Files (x86)\Adobe\Adobe Photoshop CS3\Scripting Guide\
- Addition scripting method to Javascript, VBscript, AppleScript
- you can use Photoshop COM interface to communicate in other programming language
- python: with win32com module, it can launch Photoshop with command shell
import win32com.client
psApp=win32com.client.Dispatch('Photoshop.Application')
psApp.preferences.rulerUnits=1 # use pixel as unit
psApp.documents.add()
- python: with comtypes module, it can launch Photoshop with command shell (not working for me)
from comtypes.client import CreateObject
psApp=CreateObject('Photoshop.Application')
- a ref video on Photoshop CS3 Python Interpreter Embed in C++
- another C++ listener integration
- What is new about scripting in Photoshop CS5
- Guides where added to you can create/delete/move guides using the DOM instead of scriptlistner
- showColorPicker was added to application for when your script needs the user to select a color
- refreshFonts and isQuicktimeAvailable were also added to application.
- two new blend modes
- printing underwent some big changes in the GUI
Basic Javascript syntax
- tool study:
- get jsh.jsx for javascript script panel inside photoshop and other js conversion tool stuff
- Export layer or group with trim: https://github.com/jwa107/Photoshop-Export-Layers-to-Files-Fast
- a good website by a Japanese guy: http://phize.net/portfolio/photoshop/columnwizard.html
- tons of js code: http://www.tranberry.com/panels/
- alert(“Hello world”);
- add guide line (before cs5)
// add guide; ref: http://phize.net/assets/templates/phize.net/portfolio/photoshop/download/ColumnWizard.jsx
function addGuide(offset, orientation) {
    var id1 = charIDToTypeID('Mk  ');
    var desc1 = new ActionDescriptor();
    var id2 = charIDToTypeID('Nw  ');
    var desc2 = new ActionDescriptor();
    var id3 = charIDToTypeID('Pstn');
    var id4 = charIDToTypeID('#Rlt');
    desc2.putUnitDouble(id3, id4, offset);
    var id5 = charIDToTypeID('Ornt');
    var id6 = charIDToTypeID('Ornt');
    var id7 = charIDToTypeID(orientation);
    desc2.putEnumerated(id5, id6, id7);
    var id8 = charIDToTypeID('Gd  ');
    desc1.putObject(id2, id8, desc2);
    executeAction(id1, desc1, DialogModes.NO);
}
- after CS5
activeDocument.guides.add(Direction.VERTICAL, 100); // orientation and offset
activeDocument.guides.removeAll()
system code
- photoshop version and preference
alert(parseInt(version));
app.preferences.rulerUnits = Units.PIXELS
app.preferences.typeUnits = TypeUnits.PIXELS
app.displayDialogs = DialogModes.NO
- default check if doc open for those process script
// ensure at least one document open
if (!documents.length) {
    alert('There are no documents open. Please choose your action next.', 'No Document');
    defaultRunForNoDoc();
}
else {
    main(); // if at least one document exists, then proceed
}
- ask user input
var input_txt = prompt('Width of your new doc', '800');alert(parseInt(input_txt));
- confirm user
var yes=confirm('Are you sure?');alert(yes); //true or false
- safe way to call a function
// begin try/catch
try {
   someUnsureFunction(newName);
}
// display error message if something goes wrong
catch(e) {
    if (confirm('An unknown error has occurred. Would you like to see more information?')) {
        alert(e + ': on line ' + e.line, 'Script Error', true);
    }
}
- select tool
function selectTool(tool) {
    var my_desc = new ActionDescriptor();
    var my_ref = new ActionReference();
    my_ref.putClass( app.stringIDToTypeID(tool) );
    my_desc.putReference( app.charIDToTypeID('null'), my_ref );
    executeAction( app.charIDToTypeID('slct'), my_desc, DialogModes.NO );
};
selectTool('zoomTool');
/**
moveTool marqueeRectTool marqueeEllipTool marqueeSingleRowTool marqueeSingleColumnTool lassoTool
polySelTool magneticLassoTool quickSelectTool magicWandTool cropTool sliceTool sliceSelectTool
spotHealingBrushTool magicStampTool patchSelection redEyeTool paintbrushTool pencilTool
colorReplacementBrushTool cloneStampTool patternStampTool historyBrushTool artBrushTool eraserTool
backgroundEraserTool magicEraserTool gradientTool bucketTool blurTool sharpenTool smudgeTool dodgeTool
burnInTool saturationTool penTool freeformPenTool addKnotTool deleteKnotTool convertKnotTool
typeCreateOrEditTool typeVerticalCreateOrEditTool typeCreateMaskTool typeVerticalCreateMaskTool
pathComponentSelectTool directSelectTool rectangleTool roundedRectangleTool ellipseTool polygonTool lineTool
customShapeTool textAnnotTool soundAnnotTool eyedropperTool colorSamplerTool rulerTool handTool zoomTool
*/
Tool operation code
- select a brush
function c2t(s) { return app.charIDToTypeID(s); };
function s2t(s) { return app.stringIDToTypeID(s); };

function selectBrush(brushName) {
    var my_ref = new ActionReference();
    my_ref.putName( c2t( "Brsh" ), brushName);
    var my_desc = new ActionDescriptor();
    my_desc.putReference( c2t( "null" ), my_ref );
    executeAction( c2t("slct"), my_desc, DialogModes.NO );
};

function brushSize(brushSize) {
    var my_ref = new ActionReference();
    my_ref.putEnumerated( c2t("Brsh"), c2t("Ordn"), c2t("Trgt") );
    var my_descBrush = new ActionDescriptor();
    my_descBrush.putUnitDouble( s2t("masterDiameter"), c2t("#Pxl"), brushSize );

    var my_desc = new ActionDescriptor();
    my_desc.putReference( c2t("null"), my_ref );
    my_desc.putObject( c2t("T   "), c2t("Brsh"), my_descBrush );
    executeAction( c2t("setd"), my_desc, DialogModes.NO );
};

function brushHard(hardness) {
    if(parseInt(hardness) > 100) hardness= 100;
    var my_ref = new ActionReference();
    my_ref.putEnumerated( c2t("Brsh"), c2t("Ordn"), c2t("Trgt") );
    var my_descBrush = new ActionDescriptor();
    my_descBrush.putUnitDouble( s2t("hardness"), c2t("#Pxl"), hardness);

    var my_desc = new ActionDescriptor();
    my_desc.putReference( c2t("null"), my_ref );
    my_desc.putObject( c2t("T   "), c2t("Brsh"), my_descBrush );
    executeAction( c2t("setd"), my_desc, DialogModes.NO );
};

selectBrush("Soft Round" );
brushSize(20);
brushHard(20);
Layer operation code
- get layer count
app.activeDocument.layers.length; //<4:>
- new/delete layer
app.activeDocument.artLayers.add();
activeDocument.activeLayer.remove();

activeDocument.activeLayer.kind = LayerKind.TEXT; // make into text layer
var textItem = activeDocument.activeLayer.textItem;
textItem.contents = "My Layer is "+"Cool";
textItem.size = 24;
textItem.font = "ComicSansMS";
var newColor = new SolidColor();
newColor.rgb.red = 255;
newColor.rgb.green = 255;
newColor.rgb.blue = 0;
textItem.color = newColor;
myTextRef.position = new Array( 20, 80); // percentage from left top
- rename layer
activeDocument.activeLayer.name='Test';
- select layer by name
activeDocument.activeLayer = activeDocument.artLayers.getByName("layerName");
// inside a set
activeDocument.activeLayer = activeDocument.layerSets["LayerSetName"].artLayers.getByName("LayerName");
- layer opacity
activeDocument.activeLayer.opacity = 85;
- layer blend mode
activeDocument.activeLayer.blendMode = BlendMode.MULTIPLY; //BlendMode.SCREEN; BlendMode.NORMAL;
- toggle layer lock
activeDocument.activeLayer.allLocked = !activeDocument.activeLayer.allLocked;
- toggle layer visibility
activeDocument.activeLayer.visible= !activeDocument.activeLayer.visible;
- clip mask layer for below
activeDocument.activeLayer.grouped = 1;
- check bg layer mode
alert(activeDocument.activeLayer.isBackgroundLayer);
- select up,lower,front,back layer
function selectLayerNav(direction){
    var my_ref = new ActionReference();
    var my_desc = new ActionDescriptor();
    my_ref.putEnumerated( charIDToTypeID("Lyr "), charIDToTypeID("Ordn"), charIDToTypeID(direction) );
    my_desc.putReference( charIDToTypeID("null"), my_ref );
    my_desc.putBoolean( charIDToTypeID( "MkVs" ), false );
    executeAction( charIDToTypeID("slct"), my_desc, DialogModes.NO );
}
selectLayerNav("Frwr"); //"Frwr", "Bckw", "Frnt", "Back"
- rasterize layer
if (activeDocument.activeLayer.kind == LayerKind.NORMAL)
{activeDocument.activeLayer.rasterize(RasterizeType.ENTIRELAYER);} // art layer with mask
if (activeDocument.activeLayer.kind == LayerKind.TEXT)
{activeDocument.activeLayer.rasterize(RasterizeType.TEXTCONTENTS);} // text layer
if (activeDocument.activeLayer.kind == LayerKind.SOLIDFILL)
{activeDocument.activeLayer.rasterize(RasterizeType.SHAPE);} // shape layer
- get all the smart object layer in document
var result_list = new Array;
var srcDoc = app.activeDocument;
var numOfLayers = srcDoc.layers.length;
for (var i = numOfLayers -1; i >= 0; i--)
{
    if(srcDoc.layers[i].kind == LayerKind.SMARTOBJECT)
    {
        result_list.push(srcDoc.layers[i].name);
    }
}
alert (result_list.join("\n"));
Doc operation code
- new doc file and close
documents.add(1240, 1754, 72, "Untitled", NewDocumentMode.RGB, DocumentFill.WHITE, 1.00);
// <[Document Untitled]:> ; 1240cmx1754cm

var defaultRulerUnits = preferences.rulerUnits;
preferences.rulerUnits = Units.PIXELS;
var newDocumentRef = documents.add(800, 600, 72.0, "Plan 800", NewDocumentMode.RGB, DocumentFill.WHITE);
// for PS CS and PS 7, NewDocumentMode.RGB is DocumentMode.RGB
preferences.rulerUnits = defaultRulerUnits;
// 800px, 600px
newDocumentRef = null;

while (app.documents.length) {
app.activeDocument.close();
}
- resize doc
app.activeDocument.resizeImage('150%', '150%');
- resize to A4 size ratio
/*
reisize to fit A4
by ying n chatGPT
2023.03.05
*/
// Get the active document
var doc = app.activeDocument;
app.backgroundColor.rgb.red = 255;
app.backgroundColor.rgb.green = 255;
app.backgroundColor.rgb.blue = 255;
// Define the A4 size in pixels (assuming 300 DPI)
var a4Width = 2480; // 8.27 inches * 300 pixels per inch
var a4Height = 3508; // 11.69 inches * 300 pixels per inch
var a4Ratio = a4Width / a4Height;

// Get the current canvas size
var currentWidth = doc.width.value;
var currentHeight = doc.height.value;
var currentRatio = currentWidth / currentHeight;

// Calculate the new canvas size
var newWidth = currentWidth;
var newHeight = currentHeight;
if (currentRatio > a4Ratio) {
  // Extend the height to match the A4 ratio
  newHeight = Math.round(newWidth / a4Ratio);
} else {
  // Extend the width to match the A4 ratio
  newWidth = Math.round(newHeight * a4Ratio);
}

// Only resize the canvas if the new size is larger than the current size
if (newWidth > currentWidth || newHeight > currentHeight) {
  // Calculate the position of the current content
  var x = Math.round((newWidth - currentWidth) / 2);
  var y = Math.round((newHeight - currentHeight) / 2);

  // Resize the canvas
  doc.resizeCanvas(newWidth, newHeight, AnchorPosition.MIDDLECENTER);
}
- file and folder
var samplesFolder = Folder(app.path + "/Samples/")
var fileList = samplesFolder.getFiles()
- get active doc
app.activeDocument; //<[Document Untitled]:>
var docName = app.activeDocument.name; // just name.ext
fileFullPath = app.activeDocument.fullName; // full path to file
fileFolderPath = app.activeDocument.path; // full path to parent folder of the file, no end /

index = (docName.name).indexOf(".");
fileName = (docName.name).substr(0, index); // file name with ext
- publishJPG.jsx : save current PSD file as fileName_publish.jpg in same folder
- publishJPG.jsx
//ref : http://forums.adobe.com/thread/594393
function saveJPEG( doc, saveFile, qty ) {
     var saveOptions = new JPEGSaveOptions( );
     saveOptions.embedColorProfile = true;
     saveOptions.formatOptions = FormatOptions.STANDARDBASELINE;
     saveOptions.matte = MatteType.NONE;
     saveOptions.quality = qty;
     doc.saveAs( saveFile, saveOptions, true );
}
//saveJPEG( app.activeDocument, new File('~/Desktop/sample.jpg'), 10 );

var doc = app.activeDocument;
var docName = doc.name;
docName = docName.match(/(.*)(\.[^\.]+)/) ? docName = docName.match(/(.*)(\.[^\.]+)/):docName = [docName, docName];
var suffix = '_publish';
var savedName = decodeURI(doc.path)+'/'+docName[1]+suffix+'.jpg'
if (! File(savedName).exists ){
     var savedFile = new File(decodeURI(doc.path)+'/'+docName[1]+suffix+'.jpg');
     saveJPEG( app.activeDocument,savedFile, 10 );
}
- print each layer
var msg = "Make sure you set your print setting correct and done,\nthen click Yes to run batch print layer"
if (confirm(msg)) {
    // Get the current active document
    var doc = app.activeDocument;

    // Get all the layers except the background layer
    var layers = [];
    for (var i = 0; i < doc.layers.length; i++) {
        if(!doc.layers[i].isBackgroundLayer){
            layers.push(doc.layers[i]);
        }
    }
    // Hide all the layers
    for (var i = 0; i < layers.length; i++) {
        layers[i].visible = false;
    }

    // Loop through each layer and print it
    for (var i = 0; i < layers.length; i++) {
        // Show the current layer
        layers[i].visible = true;

        // Print the current layer
        app.activeDocument.print();
        //alert('printing'+layers[i].name)

        // Hide the current layer
        layers[i].visible = false;
    }

    // Show all the layers again
    for (var i = 0; i < layers.length; i++) {
        layers[i].visible = true;
    }
} else {
  alert("Printing cancelled.");
}
- split image vertically equally into N part, and stack into new doc, optionally crop border pixel
//=======================================
//#  image split by n
//=======================================
var doc = app.activeDocument;

// Prompt the user for the number of parts
var n = parseInt(prompt("Enter the number of parts to split the image into:", 4));

// Calculate the height of each part
var partHeight = Math.floor(doc.height / n);

// Create a new document with the width of the original image and the height of one part
var newDoc = app.documents.add(doc.width, partHeight, doc.resolution, "Split Image");

// Loop through each part of the image
for (var i = 0; i < n; i++) {
  // Define the source rectangle for the part
  var sourceRect = [
    [0, i * partHeight],
    [doc.width, i * partHeight],
    [doc.width, (i + 1) * partHeight],
    [0, (i + 1) * partHeight]
  ];

  // Activate the source document
  app.activeDocument = doc;
  // Deselect any active selection
  doc.selection.deselect();
  // Create a new selection
  doc.selection.select(sourceRect);
  // Copy the part to the new document
  doc.selection.copy();
  // Activate the new document
  app.activeDocument = newDoc;
  // Paste the part into the new document
  newDoc.paste();
  // Move the selection down by the height of one part
  app.activeDocument = doc;
  doc.selection.translateBoundary(0, partHeight);
}
//=======================================
//#  trim border
//=======================================
app.activeDocument = newDoc;
newDoc.trim(TrimType.TOPLEFT, true, true, true, true);
Execute code
- open folder
var f = app.activeDocument.path;
//var f = Folder(Folder.desktop+'/test');
f.execute();
- run a cmd script
var file = new File("/D/myFolder/myCmd.bat");
file.execute();
- run js file, method 1
// @include "FileIncludeIncluded.jsx"
// above line is including other file, you need to put // in front.
- note: the include method actually copy over all the code in that file, means, the variable data in that include file will be pass over into current file, in addition, if no absolute pass given, the include refer to the same folder path, example
- js_include_js.jsx
//@include "js_alert.jsx"
alert(result); // catch result
- js_alert.jsx
alert('JS here'); // with alert or without doesn't matter
result = "Result pass";
- run js file, method 2, note, can not catch result from that file unlike method 1
- js_call_js.jsx
var jsx_file = "D:\\Dev\\PyQT\\PyPS\\js_alert.jsx"; // fine
//var jsx_file = "D:/Dev/PyQT/PyPS/js_alert.jsx"; // fine and prefer for cross-platform
//var jsx_file = "/D/Dev/PyQT/PyPS/js_alert.jsx"; // fine and photoshop return this
mydesc = new ActionDescriptor();
mydesc.putPath(charIDToTypeID("jsCt"),  new File(jsx_file) ); // if the script already list in script menu, then just put the name like "MyScript" to call it instead of new file
mydesc.putString(charIDToTypeID("jsMs"), "undefined" );
executeAction( stringIDToTypeID( "AdobeScriptAutomation Scripts" ), mydesc, DialogModes.NO );
- run py file
var myPy = new File("/path_to_file/pyFun.py");
myPy.execute();
Memory and Data store and retrieve
- example code with keystrock detect “ScriptUI.environment.keyboardState.shiftKey” and putCustomOptions/getCustomOptions: https://dribbble.com/shots/618442-Photoshop-Tip?list=searches&tag=photoshop_script
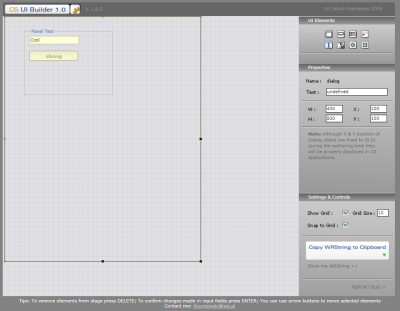
Javascript GUI scripting
- read Photoshop sample script code like this:
- ScriptUI GUI code generator (broken link): http://www.jkozniewski.com/tools/csib_loader.swf
- since that link is outdated, you can grab from http://web.archive.org
- or download from my save “CS UI Buider v1.0.2 by Jakub Kozniewski” cs_ui_builder_1.0.2.zip
- note: the 2.0a is a exe version, which not work for me, you can get from here https://github.com/Faham/bric-n-brac/tree/master/tools/external
- There is also AfterEffect jsx script do ScriptUI design called P9 ScriptUI builder: https://aescripts.com/p9-scriptui-builder/

- custom dialog window with button function (note: this \ style of ui code will cause BridgeTalk object method not working.)
function winRun() {
    var ui_code = "dialog { \
    text: 'My Window Title', \
    bounds: [100,10,310,100], \
    w_label: StaticText { text:'Width mm', bounds:[10, 5, 70, 25] }, \
    w_input: EditText { text:'100', bounds: [75, 5, 120, 25] }, \
    h_label: StaticText { text:'Height mm', bounds:[10, 30, 70, 50] }, \
    h_input: EditText { text:'200', bounds:[75, 30, 120, 50] }, \
    my_btn: Button { text:'Fun', bounds:[130, 5, 200, 25] }, \
    run_btn: Button { text:'Run', bounds:[130, 30, 200, 50], properties:{name:'ok'}}, \
    quit_btn: Button { text:'Quit', bounds:[130, 55, 200, 75], properties:{name:'cancel'}} \
    }";
    var ui = new Window(ui_code);
    ui.my_btn.onClick = function() {alert("My Function Here");}
    var result = ui.show();
    alert(result + '\n' + ui.w_input.text + '\n' + ui.h_input.text);
}
winRun();
ScriptUI in Detail
Window Type - Pallete and Dialog
- There are 2 window type
- pallete (non-modal window, not block user and Application interaction, has close icon on title bar)
- Note: Photoshop, Illustrator will not keep display it; AfterEffects will keep display it
- dialog (modal window, block user and Application interaction, user has to click button to close it)
- demo script, just change line 2 and line 3 to show the difference of pallete and dialog
- ui_demo.jsx
//var win_type = "palette";
var win_type = "dialog";
var ui = win_type+" {orientation: 'column',alignChildren: ['fill', 'top'],preferredSize:[300, 130],text: 'Title Here',margins:15,";
  var slider_panel = "slider_panel: Panel {orientation: 'row',alignChildren: 'right',margins:15,text: 'Panel Title',";
      slider_panel +="value_label: StaticText { text: 'Value:' },";
      slider_panel +="value_slider: Slider { minvalue: 1, maxvalue: 100, value: 30, size:[220,20] },";
      slider_panel +="value_edit: EditText { text: '30', characters: 5, justify: 'left'}";
      slider_panel +="}";
  ui+=slider_panel;
  var btm_grp = "btm_grp: Group{";
    btm_grp +="value_check: Checkbox { text:'Checkbox value', value: true },";
    btm_grp +="cancel_btn: Button { text: 'Cancel', properties:{name:'cancel'}, size: [120,24], alignment:['right', 'center'] },";
    btm_grp +="apply_btn: Button { text: 'Apply', properties:{name:'ok'}, size: [120,24], alignment:['right', 'center'] },";
    btm_grp +="}";
  ui+=btm_grp;
  ui +="}";
var win = new Window(ui);
win.btm_grp.cancel_btn.onClick = function() { win.close() };
win.btm_grp.apply_btn.onClick = function() { win.close() };
win.show();
Working Float Pallete in Photoshop and Illustrator
- As mentioned above, Pallete is ideal choice for tool panel design, as dialog prevent main App interaction until close, but Pallete is closed automatically after script code finished, thus we need following solution to work around Pallete limit in Photoshop and Illustrator
- use BridgeTalk object as message to send to the Application instead ask the Application to create window. so the Message stands as its own thread
- ref:
- sample code, change target to your application, the script can be launch from any Adobe app, but only the target will receive it, as it is like a letter with receiver name, all Adobe app will pass the message to the Target.
- ui_pallete_BT.jsx
function WinObject() {
  var win_type = "palette";
  var ui = win_type+" {orientation: 'column',alignChildren: ['fill', 'top'],preferredSize:[300, 130],text: 'Title Here',margins:15,";
    var slider_panel = "slider_panel: Panel {orientation: 'row',alignChildren: 'right',margins:15,text: 'Panel Title',";
        slider_panel +="value_label: StaticText { text: 'Value:' },";
        slider_panel +="value_slider: Slider { minvalue: 1, maxvalue: 100, value: 30, size:[220,20] },";
        slider_panel +="value_edit: EditText { text: '30', characters: 5, justify: 'left'}";
        slider_panel +="}";
    ui+=slider_panel;
    var btm_grp = "btm_grp: Group{";
      btm_grp +="value_check: Checkbox { text:'Checkbox value', value: true },";
      btm_grp +="cancel_btn: Button { text: 'Cancel', properties:{name:'cancel'}, size: [120,24], alignment:['right', 'center'] },";
      btm_grp +="apply_btn: Button { text: 'Apply', properties:{name:'ok'}, size: [120,24], alignment:['right', 'center'] },";
      btm_grp +="}";
    ui+=btm_grp;
    ui +="}";
  var win = new Window(ui);
  win.btm_grp.cancel_btn.onClick = function() { win.close() };
  win.btm_grp.apply_btn.onClick = function() { win.close() };
  win.show();
};
var message = WinObject.toString();
message += "\nnew WinObject();"
var bt = new BridgeTalk();
//bt.target = "aftereffects";
bt.target = "photoshop";
//bt.target = "illustrator";
bt.body = message;
bt.send();
- thus, BridgeTalk is good solution for inter-Adobe app communication.
- call_ps_from_ai.jsx
// the BridgeTalk Object
var bt = new BridgeTalk();
// the communication target
bt.target = "photoshop";
// The script to be executed as a String
var message = "alert('Hello Photoshop')";
// assign to the object's body the message
bt.body = message;
// send the message to the target app
bt.send(); // an alert will pop-up in Photoshop
One-For-All solution with BridgeTalk for Working Float Pallete
- As BridgeTalk is the key for working float pallet, but in a BridgeTalk, the target App is pre-defined in the script, like bt.target=“Photoshop”, and also the whole script is wrapped in a message,
- The One-For-All solution is use BridgeTalk to launch existing normal-styped javascript jsx file, so the main function and launcher are separated into 2 files,
- example code as below
- launch_js_for_ps.jsx
var script_name = "ui_demo.jsx";
var currentPath = (new File($.fileName)).path; // retrieve the current script path
var scriptToLoad = new File (currentPath + "/"+script_name); // the script to load
try {
    if (!scriptToLoad.exists) { throw new Error("script not found!"); }
    scriptToLoad.open ("r"); // read only
    var message = scriptToLoad.read();
    scriptToLoad.close();
} catch (error) {
    alert("Error parsing the file: " + error.description);
}
var bt = new BridgeTalk();
bt.target = "photoshop";
bt.body = message;
bt.send();
Special Note for BridgeTalk Method
- use “\” way of ui coding will cause BridgeTalk method's button callback not working, thus the window resource string can't contain backslashes “\”
- jsxbin is jsx in binary encoded (which can be exported from jsx in ExtendScript TookKit); the message also can take binary string and embed your script in the BridgeTalk object.
- example code (\ added for each line from original ui_demo.jsxbin)
- ui_demo_inBinary.jsx
var message = "@JSXBIN@ES@2.0@MyBbyBn0ATJAnASzIjXjJjOifjUjZjQjFByBneHjQjBjMjFjUjUjFftJCnASzCjVj\
JCyBCzBhLDVBfyBnnejOhAjbjPjSjJjFjOjUjBjUjJjPjOhahAhHjDjPjMjVjNjOhHhMjBjMjJjHjOi\
DjIjJjMjEjSjFjOhahAibhHjGjJjMjMhHhMhAhHjUjPjQhHidhMjQjSjFjGjFjSjSjFjEiTjJjajFha\
ibhThQhQhMhAhRhThQidhMjUjFjYjUhahAhHiUjJjUjMjFhAiIjFjSjFhHhMjNjBjSjHjJjOjThahRh\
VhMnftJDnASzMjTjMjJjEjFjSifjQjBjOjFjMEyBneiejTjMjJjEjFjSifjQjBjOjFjMhahAiQjBjOj\
FjMhAjbjPjSjJjFjOjUjBjUjJjPjOhahAhHjSjPjXhHhMjBjMjJjHjOiDjIjJjMjEjSjFjOhahAhHjS\
jJjHjIjUhHhMjNjBjSjHjJjOjThahRhVhMjUjFjYjUhahAhHiQjBjOjFjMhAiUjJjUjMjFhHhMftJEn\
ASEyBCDnnnehLjWjBjMjVjFifjMjBjCjFjMhahAiTjUjBjUjJjDiUjFjYjUhAjbhAjUjFjYjUhahAhH\
iWjBjMjVjFhahHhAjdhMntfJFnASEyBCDnnneiOjWjBjMjVjFifjTjMjJjEjFjShahAiTjMjJjEjFjS\
hAjbhAjNjJjOjWjBjMjVjFhahAhRhMhAjNjBjYjWjBjMjVjFhahAhRhQhQhMhAjWjBjMjVjFhahAhTh\
QhMhAjTjJjajFhaibhShShQhMhShQidhAjdhMntfJGnASEyBCDnnneiCjWjBjMjVjFifjFjEjJjUhah\
AiFjEjJjUiUjFjYjUhAjbhAjUjFjYjUhahAhHhThQhHhMhAjDjIjBjSjBjDjUjFjSjThahAhVhMhAjK\
jVjTjUjJjGjZhahAhHjMjFjGjUhHjdntfJHnASEyBCDnnneBjdntfJInASCyBCDnVEfyBnnntfJJnAS\
zHjCjUjNifjHjSjQFyBnePjCjUjNifjHjSjQhahAiHjSjPjVjQjbftJKnASFyBCDnnnehdjWjBjMjVj\
FifjDjIjFjDjLhahAiDjIjFjDjLjCjPjYhAjbhAjUjFjYjUhahHiDjIjFjDjLjCjPjYhAjWjBjMjVjF\
hHhMhAjWjBjMjVjFhahAjUjSjVjFhAjdhMntfJLnASFyBCDnnnejRjDjBjOjDjFjMifjCjUjOhahAiC\
jVjUjUjPjOhAjbhAjUjFjYjUhahAhHiDjBjOjDjFjMhHhMhAjQjSjPjQjFjSjUjJjFjThajbjOjBjNj\
FhahHjDjBjOjDjFjMhHjdhMhAjTjJjajFhahAibhRhShQhMhShUidhMhAjBjMjJjHjOjNjFjOjUhaib\
hHjSjJjHjIjUhHhMhAhHjDjFjOjUjFjShHidhAjdhMntfJMnASFyBCDnnnejLjBjQjQjMjZifjCjUjO\
hahAiCjVjUjUjPjOhAjbhAjUjFjYjUhahAhHiBjQjQjMjZhHhMhAjQjSjPjQjFjSjUjJjFjThajbjOj\
BjNjFhahHjPjLhHjdhMhAjTjJjajFhahAibhRhShQhMhShUidhMhAjBjMjJjHjOjNjFjOjUhaibhHjS\
jJjHjIjUhHhMhAhHjDjFjOjUjFjShHidhAjdhMntfJNnASFyBCDnnneBjdntfJOnASCyBCDnVFfyBnn\
ntfJPnASCyBCDnnneBjdntfJQnASzDjXjJjOGyBEjzGiXjJjOjEjPjXHfRBVCfyBftnftJRnABXzHjP\
jOiDjMjJjDjLIfXzKjDjBjOjDjFjMifjCjUjOJfXFfVGfyBNyBnAMRbyBn0ABJRnAEXzFjDjMjPjTjF\
KfjGfnf0DzALCRnfJSnABXIfXzJjBjQjQjMjZifjCjUjOMfXFfVGfyBNyBnAMSbyBn0ABJSnAEXKfjG\
fnf0DLCSnfJTnAEXzEjTjIjPjXNfVGfyBnfAFC4B0AiAG4E0AiAB40BiAE4C0AiAF4D0AiAAFALByB";

var bt = new BridgeTalk();
bt.target = "photoshop";
bt.body = message;
bt.send();
jsx and jsxbin
- jsxbin is encryted version of jsx, and it is not true binary encoded but mixed using encryption table, ref doc as below:
- Reversing JSXBIN File Type: https://www.scip.ch/en/?labs.20140515
- a jsxbin decoder project in c#: https://github.com/KarlPan/jsxbin-to-jsx-converter
Python Scripting for Photoshop (win32com and comtypes method for Windows, appscript method for mac)
- use com similar function with appscript on Mac
import sys
psApp = None
try:
    if sys.platform == 'darwin':
        from appscript import *
        psApp = app('Adobe Photoshop CS5')
    else:
        from win32com.client import Dispatch
        psApp = Dispatch('Photoshop.Application')
        #import comtypes
        #psApp = comtypes.client.CreateObject('Photoshop.Application')
except:
    pass
- extra reading for related:
- com way to automate keystroke for app automation in python (of course, win only):
- com way to python and illustrator: http://www.noah.org/python/com/illustrator/
- of course, inkscape, gimp, blender all use python by default, while Adobe suites use javascript for cross-platform and cross application
- of course, all directly use Python library to generate graphics, and import back to other graphic app.
- method 1: use Com to Ask Photoshop to run a JSX file, Python + COM + javascript
- js function creation by built-in photoshop listener: http://www.kirupa.com/motiongraphics/scripting5.html
- python code
- callJS.py
def runJSX (aFilePath ):
    id60 = psApp.stringIDToTypeID ( "AdobeScriptAutomation Scripts" )
    desc12 = comtypes.client.CreateObject('Photoshop.ActionDescriptor')
    id61 = psApp.charIDToTypeID( "jsCt" )
    desc12.putPath( id61, aFilePath )
    id62 = psApp.charIDToTypeID( "jsMs" )
    desc12.putString( id62, "null" )
    psApp.executeAction( id60, desc12, 2 )

psApp = comtypes.client.CreateObject('Photoshop.Application')
runJSX ( "C:\\OpenDocument.jsx" )
- additional support, call python from javascript
- callPy.jsx
var myPy = new File("/path_to_file/pyFun.py");
myPy.execute();
- method 2: Python(Qt) + comtypes/win32com directly call Photoshop built-in API functions (as if it is in Javascript)
- python code
import sys
from PyQt4.QtGui import *
import comtypes.client

class LayerSetsExporter(QWidget):

    def __init__(self, parent = None):
        super(LayerSetsExporter, self).__init__(parent)
        self.createLayout()
        self.createConnection()

    def setLayerSetsVisible(self, layerSets, state):
        for layerSet in layerSets:
            layerSet.visible = False

    def processRun(self):
        outputPath = 'D:/Python/Temp/'

        app = comtypes.client.CreateObject('Photoshop.Application')
        doc = app.activeDocument

        optionJpg = comtypes.client.CreateObject('Photoshop.JPEGSaveOptions')
        optionJpg.quality = 8

        count = 0
        layerSets = doc.layerSets
        for layerSet in layerSets:
            self.setLayerSetsVisible(layerSets, False)
            layerSet.visible = True
            doc.saveAs(outputPath + str(count) + '.jpg', optionJpg, True)
            count += 1

    def createLayout(self):
        self.btnRun = QPushButton('&Run')
        layout = QVBoxLayout()
        layout.addWidget(self.btnRun)

        self.resize(200,100)
        self.setWindowTitle('PS LayerSets Exporter')
        self.setLayout(layout)

    def createConnection(self):
        self.btnRun.clicked.connect(self.processRun)

qApp = QApplication(sys.argv)

exporter = LayerSetsExporter()
exporter.show()

qApp.exec_()
- additional support, convert Photoshop Listener output javascript code to python code
- python code
def hueSaturation(hue, saturation, lightness, colorize=False, psApp=None):
    if psApp is None:
        psApp = win32.gencache.EnsureDispatch('Photoshop.Application')
    dialogMode = 3
    idHStr = psApp.CharIDToTypeID( "HStr" )
    desc169 = win32.gencache.EnsureDispatch( "Photoshop.ActionDescriptor" )
    idpresetKind = psApp.StringIDToTypeID( "presetKind" )
    idpresetKindType = psApp.StringIDToTypeID( "presetKindType" )
    idpresetKindCustom = psApp.StringIDToTypeID( "presetKindCustom" )
    desc169.PutEnumerated( idpresetKind, idpresetKindType, idpresetKindCustom )
    idClrz = psApp.CharIDToTypeID( "Clrz" )
    desc169.PutBoolean( idClrz, colorize )
    idAdjs = psApp.CharIDToTypeID( "Adjs" )
    list27 = win32.gencache.EnsureDispatch( "Photoshop.ActionList" )
    desc170 = win32.gencache.EnsureDispatch( "Photoshop.ActionDescriptor" )
    idH = psApp.CharIDToTypeID( "H   " )
    desc170.PutInteger( idH, hue )
    idStrt = psApp.CharIDToTypeID( "Strt" )
    desc170.PutInteger( idStrt, saturation )
    idLght = psApp.CharIDToTypeID( "Lght" )
    desc170.PutInteger( idLght, lightness )
    idHsttwo = psApp.CharIDToTypeID( "Hst2" )
    list27.PutObject( idHsttwo, desc170 )
    desc169.PutList( idAdjs, list27 )
    psApp.ExecuteAction( idHStr, desc169, dialogMode )
Python Scripting for Photoshop (no win32com and comtypes for cross-platform)
- case 1: with Photopshop JSX open a socket actively and listen to outside calls, while this cost Photoshop hanging there just listening and lose interactivity.
- no extra library required, since both way use socket communication
- it support Bridge CS5, InDesign CS5, InCopy CS5, After Effects CS5, Photoshop CS5 and above
- ref - more 2 way solution: http://jfli04.blogspot.sg/2012/06/javascript-and-python-communication-by.html
- instruction:
- open socket in Photoshop first
- ps_connect_listener.jsx
// requires photoshop CS5+ and run in Photoshop
conn = new Socket();
var keep_serving = true;
while (keep_serving) {
    if (conn.listen(8123))  // any port
    {
        // wait forever for a connection
        var incoming;
        do incoming = conn.poll();
        while (incoming == null);

        new_cmd = incoming.read();
        try {
            if (null != new_cmd) {
                result =eval(new_cmd);
                incoming.writeln(result + "\nOK\n");
            }
            else {
                incoming.writeln("no command\nFAIL\n");
            }
        }
        catch (err) {
            incoming.writeln(err + "FAIL\n");
            incoming.close();
            delete incoming;
        }
    }
}
- call from python next
- ps_connect_caller.py
import socket
HOST = '127.0.0.1'
PORT = 8123

def send_photoshop(msg):
    conn = socket.socket(socket.AF_INET, socket.SOCK_STREAM)
    conn.connect((HOST,PORT))
    conn.send(msg)
    result = conn.recv(4096)
    conn.close()
    print(result)
    return result

send_photoshop("alert('Got it');")
send_photoshop("activeDocument.artLayers.add();")
send_photoshop("keep_serving = false;") #stop the server
- case 2: with leaving photoshop alone, and outside connect to photoshop with password.
- required cs5.5+ server connect (edit menu > remote connection in Photoshop checked), since Photoshop CS 5.5, it has remote connection server built-in inside photoshop
- extra library required because of encrypted connection
- instruction
# get pyps module in photoshopConnection for connect function to PS from https://github.com/theiviaxx/photoshopConnection
# get pbkdf2 module support encrypted TCP connection for above from https://pypi.python.org/pypi/pbkdf2

import sys
path = 'pathToThatModule/photoshopConnection'
path in sys.path or sys.path.append(path)
path = 'pathToThatModule/pbkdf2-1.3'
path in sys.path or sys.path.append(path)

from pyps import Connection, EventListener, ConnectionError
c = Connection()
#c.connect('ps_password', '192.168.1.8') # optional remote photoshop server on other computer
c.connect('123456') # when you set password in photoshop as 123456
c.send_sync('app.foregroundColor.rgb.red=255;') # need ; for each end command
c.send_sync('app.foregroundColor.rgb.green=0;')
c.send_sync('app.foregroundColor.rgb.blue=128;')
res = c.send_sync('app.activeDocument.artLayers.add();') # <[ArtLayer Layer 2]:>
res = c.send_sync("activeDocument.activeLayer.name='Remote layer';") # <Test:>
c.close()

# it also have listerner feature, which keep listening how what Photoshop do
- case 3: jsx file passing method for any Photoshop version v7.0+ or any adobe app with javascript support (no need remote server feature)
- I improved based on this user case: (for win and mac, eg app using this like Quixel's dDo))
- system command to ask Photoshop run a jsx file
photoshop.exe "pathToScript/my_script.jsx" # win
open -b com.adobe.Photoshop --args "pathToScript/my_script.jsx" # mac
- python code
- module_photoshop.py
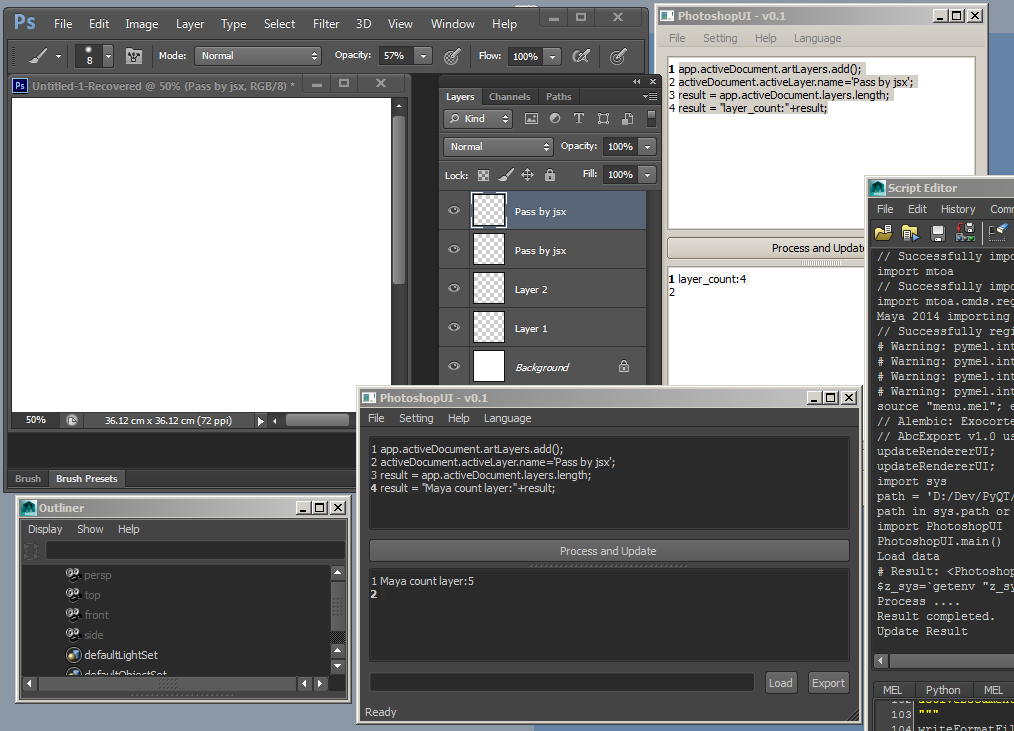
'''
by ying: 2016.11.22 http://shining-lucy.com/wiki
note: make sure you have these empty 2 files next to it,
"process.jsx" and "process_output.txt"
'''
def ps_loc_win():
    import _winreg
    regKey = _winreg.OpenKey(_winreg.HKEY_LOCAL_MACHINE, "SOFTWARE\\Microsoft\\Windows\\CurrentVersion\\App Paths\\Photoshop.exe")
    regPath = _winreg.QueryValueEx(regKey, 'Path')[0] + 'Photoshop.exe'
    return regPath

def readFormatFile(file):
    with open(file) as f:
        txt = f.read()
    return txt
def writeFormatFile(txt, file):
    with open(file, 'w') as f:
        f.write(txt)

import subprocess # for call Photoshop exe
import os # for file read and process
import sys # for os detection
import time # for timer to check file
def ps_cmd(cmd_txt, timer=1):
    location = os.path.dirname(os.path.realpath(__file__))
    jsx_file = os.path.join(location, "process.jsx")
    result_file = os.path.join(location, "process_output.txt")
    # step 1: record old result date
    old_output_timestamp = os.path.getmtime(result_file)

    txt=cmd_txt
    txt+="""
        var output_file = new File('{0}');
        output_file.open("w");
        if(typeof result !== "undefined") output_file.writeln(String(result));
        else output_file.writeln("");
        output_file.close();
        """.format(result_file.replace("\\","/"))
    writeFormatFile(txt, jsx_file)
    # step 2: process cmd
    if sys.platform in ['win32','win64']:
        ps_loc = ps_loc_win()
        subprocess.Popen(ps_loc+" "+jsx_file)
    elif sys.platform == 'darwin':
        subprocess.Popen('open -b com.adobe.Photoshop --args "{0}"'.format(jsx_file))
    # step 3: wait and get result
    timeout = time.time() + 60*timer  # default 1 minutes from now
    while True:
        time.sleep(0.1)
        if time.time() > timeout:
            print("Time Out after 1 minute and no change on result file.")
            break
        cur_output_timestamp = os.path.getmtime(result_file)
        if cur_output_timestamp > old_output_timestamp:
            print("Result completed.")
            break
    if cur_output_timestamp > old_output_timestamp:
        return readFormatFile(result_file)
    else:
        return None

# actual test example, code below can be removed
def main():
    my_cmd = """
    app.activeDocument.artLayers.add();
    activeDocument.activeLayer.name='Pass by jsx';
    result = app.activeDocument.layers.length;
    result = "layer_count:"+result;
    """

    my_result = ps_cmd(my_cmd)
    print(my_result)

if __name__ == "__main__":
    main()
- the quick ui tool with universal_tool_template.py, which can be downloaded as package here: https://github.com/shiningdesign/utt_PhotoshopUI
- here is screenshot

Advanced Javascript Scripting for Photoshop
Quick Introduction
- Javascript Scripting in Photoshop is introduced in Photoshop 7, however Photoshop 5-7 support COM script
- it is based on javascript 1.5 (2000) and new featured added, so modern javascript functions may not included.
- Javascript is cross-platform but is control Photoshop only, unlike VBscript and AppleScript controls any AppleEvents or windows COM supported application.
- For com, it is like
app = createObject("Photoshop.Application.versionNum")
- download scripting guide cs2-cc: http://www.adobe.com/devnet/photoshop/scripting.html
- ref:
- variable type
- string, number, boolean, null, object, undefined
- variable store
- value, object reference
- other
- command and methods
Advance scripting Start Kit
- Get XToolkit 2.2 from : http://ps-scripts.sourceforge.net/xtools.html
- a javascript standard library to get modern javascript functions and extras for photoshop functions
- a console to test script: JShell
- a list of utility to convert Photoshop asssets
Additional Option for custom panel in Photoshop
- for cs3 till cs6, the flash panel is supported, but it won't work in CC since they move into html5,
- anyway, the flash panel is no good, since it is a dialog, it block interactivity until you close.
- here is where you can still find it, FlashUISample.jsx and related: https://github.com/tahoedesigner/ExtendScript/tree/master/Adobe%20Sample%20Scripts
- for cs5 and above, the Plug-ins\Panels is there for plugin panels, then the Windows > Extension to show the panels
- for photoshop CS5 and above, there is Adobe Configurator to create custom panel without code
- download of adobe configurator: http://labs.adobe.com/technologies/configurator/
- additional notes:
- from adobe configurator 4, it moves fully to HTML5-based panels, also extension builder 3 also move to HTML5-based panels
- Develop HTML Panels for Adobe CC apps: Extension Builder (or just a text editor)
- other tools using custom panel:
- Export kit: http://exportkit.com/lightning-storm-cc
- More news on CC version and above:
- other example project
- cc based panel let u list jsx file and run: https://github.com/moremorefor/JSXExecutor
Conclusion
- so conclusion, if you are not stuck with old technology, and you willing to move to adobe CC version, HTML5 is the way to go for all new techs instead of Python fighting into adobe apps.
Update 2022:
- PS automation tech age:
- oldest: Actions (since v4) - macros by record and playback but no logic and no interface
- older: ExtendScript (AppleScript/VBScript), ScriptUI, C++
- jsx - (js v3)
- old: CEP panel (Common Extensibility Platform) https://github.com/Adobe-CEP
- html5
- new and fresh: UXP (Unified Extensibility Platform) for PS 2021+ (v22)
- new js support
- Building Plugins for Adobe Photoshop and XD using UXP: https://www.youtube.com/watch?v=6iFVozCJ1aw
- Rundown of the UXP Announcement at MAX 2020: https://www.youtube.com/watch?v=zAOUBpDjc1Q
UXP feature:
- modern JS, new File API