Automation with Blender: python:blender
Get Python Qt setup in Blender
UPDATE: 2020/06.23 install PySide2 for Blender 2.83
- go to Blender install folder, D:\YourPathToThat\blender-2.83.0-windows64\2.83\python\bin
- copy the path, and go commandline (type D: enter if your blender in D drive, C drive no need):
- for Mac and Linux, same, just cd to that directory, and do above. the drive letter thing is just for windows, if you prefer to put app in other drive
- run command code
cd D:\YourPathToThat\blender-2.83.0-windows64\2.83\python\bin
D:
.\python.exe -m pip install PySide2
- for mac, change version number accordingly
/Applications/Blender.app/Contents/Resources/3.2/python/bin/python3.10 -m pip install --upgrade pip
/Applications/Blender.app/Contents/Resources/3.2/python/bin/python3.10 -m pip install pyside2
- restart blender, you should be able to call “from PySide2 import QtWidgets,QtCore,QtGui” without issue
Common Task in Blender
set camera clipping distance
- viewport, press N, to bring up tool panel, in View tab, set the far clip distance
Blender Shortcut
- right click on any menu item, you can choose “create shortcut” from there
- check all shortcut in Edit > Preference > Key Map
CG App Shortcut Compare Table
- select with LeftMouseButton is default since v2.8 in Blender,
| viewport | Blender | Maya |
|---|---|---|
| quad view | ctrl+alt+Q | space |
| view switch | numpad,ctrl+numpad | space+RMB markmenu |
| expert mode | ctrl+alt+space | ctrl+space |
| max. panel | ctrl+space | space |
| tool panel | T,F6 | ctrl+A |
| property panel | N | ctrl+A |
| view selected | num. | f |
| isolate selected | shift+h | use icon |
| view all | home | a |
| - | MMB centric | alt centric |
| rotate view | MMB drag | alt+LMB drag |
| pan view | shift+MMB drag | alt+MMB drag |
| dolly view | ctrl+MMB drag | alt+RMB drag |
| add object | shift+A menu | shift+RMB markmenu |
| select all/none | a | double click/click none |
| drag select, add,remove,toggle | b LMB drag MMB drag | default ctrl+shift drag ctrl drag shift drag |
| paint select | c | |
| soft select | o | |
| obj/vtx,edge,face mode | tab, | RMB markmenu, script |
| hide operate axis handle | ctrl+space | q |
| UI interaction | Blender | Maya |
|---|---|---|
| tear off panel | left-corner cross sign + shift LMB drag | just drag |
| swap panel | left-corner cross sign + ctrl LMB drag | - |
| slider UI | hold ctrl =10% incr hold shift = 1% incr press E to overshoot | hold ctrl = small incr middle drag in view |
| Action | Blender | Maya |
|---|---|---|
| wireframe on shaded | object property : display : wire+all edge | view menu : wireOnShade check, script |
| wire/shade view | z | 4 |
| snap toggle | shift+tab | |
| snap menu, 3d cursor | shift+S | |
| vtx, curve, grid snap | incremental snap + grid align btn | hold v, c, x |
| delete obj | x, delete | delete |
| undo | ctrl+z | ctrl+z |
| redo | ctrl+shift+z | ctrl+y |
| Duplicate object | shift+D | ctrl+D, shift+D |
| duplicate as instance | alt+D | ctrl+shift+D w option |
| repeat last action | shift+R | g |
| adjust last action | F9 | |
| hide object / unhide | H, alt+H | ctrl+H, shift+H |
| increase/decrease component selection | ctrl+Num+/- | shift+</> |
| to shell selection | L | |
| select all/none | a | double click/click none |
| continue selection | ctrl+select | shift + double click select |
| loop selection | alt+select | double click select |
| convert bet obj type | alt+C | |
| combine objects | ctrl+J | |
| separate object | ||
| center pivot | ctrl+alt+shift+C | |
| parent, unparent | ctrl+p,alt+p | p, shift+p |
Blender Special shortcut
| move obj to layer | m |
| curor/selection grid snap | shift+S |
| select border edge | ctrl+shift+alt+M |
| cursor to origin | shift+C |
| zero T,R,S | alt+G,alt+R,alt+S |
modelling shortcut in blender
| fill hole=insert face | f, ctrl+f |
|---|---|
| extrude edge, face, vtx | e, ctrl+LMB end click |
| offset=insert face | i |
| subdivide | w |
| insert edge loop=loop cut | ctrl+R w scroll |
| offset edge loop | ctrl+shift+R |
| bevel | ctrl+b |
| cut face=knife | k |
| merge vert menu | alt+m |
| average vert=smooth vert | |
| edge menu | ctrl+e |
| face menu | ctrl+f |
| vert menu | ctrl+v |
| set normal to face | ctrl+n |
Blender 2.6
Blender is 2nd 3D application I picked up when I was starting the 3D learning. (Cinema 4D is my first 3D app, Maya is my 3rd, 3DS Max is my 4th).
Before 2.6, the Blender interface is the most struggling thing to cope with,
- short named buttons
- unconventional shortcut oriented operation, wield layout
But now, as 2.6 comes with a new interface, it pops up and let you use optional Maya user interaction;
Now I started to pick it up again.
Before Blender 2.6
Navigation in Blender 3D
- number pad
- focus on selected: Num (.)
- display vertex count: viewport overlay icon on View3D, check statistics
- for show selected vertex count: select object, shift+h to hide other, view count, then alt+h/undo to show all
Interface
show selected vertex count and vertex count
- go Preference Interface > Status Bar : check Scene statistics,
show vertex index
- go Preference > Interface > Display : Developer Extra checked
- go viewport option > Developer : check Indice
Layout in Blender 3D
bounding box display:
- select the objects to show bounding box:
- go Property panel > object property tab: viewport display section
- check Bounds or choose Display As = bounding box, right click corresponding UI > copy to selected to apply to rest selected object.
Parenting:
- Parent: it will put under parent in hierarchy, keeping old location value (zero will align object to origin)
- Parent keep transform: same as above
- Parent without inverse: will parent, and zero its location.
- Parent keep transform without inverse: (like Maya parent), location will recalculate with 0 at its parent. (zero location, will put object align with its parent)
Modeling in Blender 3D
Seperate object
- Tab to EDIT mode, SPACE-EDIT-VERTICES-SEPARATE .. “p”
Select edge loop
- alt + RMB click
Material and Shader in Blender 3D
- unlike Maya, material is stored in data, and show in the list of material choice for objects
- there is no material grid view of all material created, but only from those dropdown list for object shader
- in the Shader Editor panel, it only shows current select object's material, the whole panel is belong to current active object,
- the Shader editor top dropdown UIs, it is active object material slots (how many material connected to this object) and material list in current file.
- Note, blender can create material and if no object use them, they are considered as unuse blenddata (unused datablocks), when save file, they will be delete, so your material library wont store if not used in each file.
- in Outliner, choce Blender File instead Scene in 2nd dropdown, you can see the tree of blend data structure, all materials currently there is under Material tree node.
- in short, if you want keep your shader network builds, you need to assign them to something to hold reference to them
- also, you can't reuse nodes directly cross different materials, you need to select nodes and create Node Group
- Group nodes will be shown in shade edit Add menu>Group> yourGroupNode
UV unwrap in Blender 3D
Steps:
- Many surfaces need to be “cut” to make it possible to unwrap them.
- The edges that will be cut “Seams”. In Edit Mode, selected edges can be marked or cleared as seams, using Mesh → Edges → Mark Seam (Ctrl E)
- UVs → LSCM Unwrap (E Key) in the UV editor will launch LSCM unwrapping
Scripting and GUI development
- Basic python programming tutorial in Blender 2.6
Tutorial List
- Sci Fi Animator
- tons of video guide on Blender 2.6
- CG Cookie - Blender
- quite a lot blender free and paid tutorials
- Green Screen Compositing Technique in Blender
Techniques Section
FX
- space vfx element creation tutorial: http://www.creativeshrimp.com/spacevfx.html
Addon Plugins
- save selected as
- Text FX: http://codeofart.com/text-fx/
- layout manager:
- (free) Workspace Manager for Blender
- (paid) Layout Manager
Blender Automation
- batch file to pass python_process_file and object_file to blender app
- batch_for_blender.bat
@echo off
rem Put the path of the blender folder and cd to the obj file folder
set PATH=D:\blender-2.78a-windows64

set FILENAME=Cliffs_Beach.blend
set TARGET=Cliffs_Beach.obj

blender %FILENAME% --background --python blend_to_obj.py -- %TARGET%
- the python process for file format convert in blender
- blend_to_obj.py
import bpy
import sys

argv = sys.argv
argv = argv[argv.index("--") + 1:] # get all args after "--"

obj_out = argv[0]

bpy.ops.export_scene.obj(filepath=obj_out, axis_forward='-Z', axis_up='Y')
Blender Research
Vertex density check
- (useful) Blender 2.76 Overview: Point Density : https://www.youtube.com/watch?v=ESZsWNCfpPU
- Blender 2.74: Point Density Texture in Cycles: https://www.youtube.com/watch?v=9FV03stf6X0
- Blender Tutorial - Point density based pattern: https://www.youtube.com/watch?v=KogFovV-QoA
- Datamap Visualization in Blender 3.0 Geometrynodes: https://www.youtube.com/watch?v=uwCCCR_BLdQ
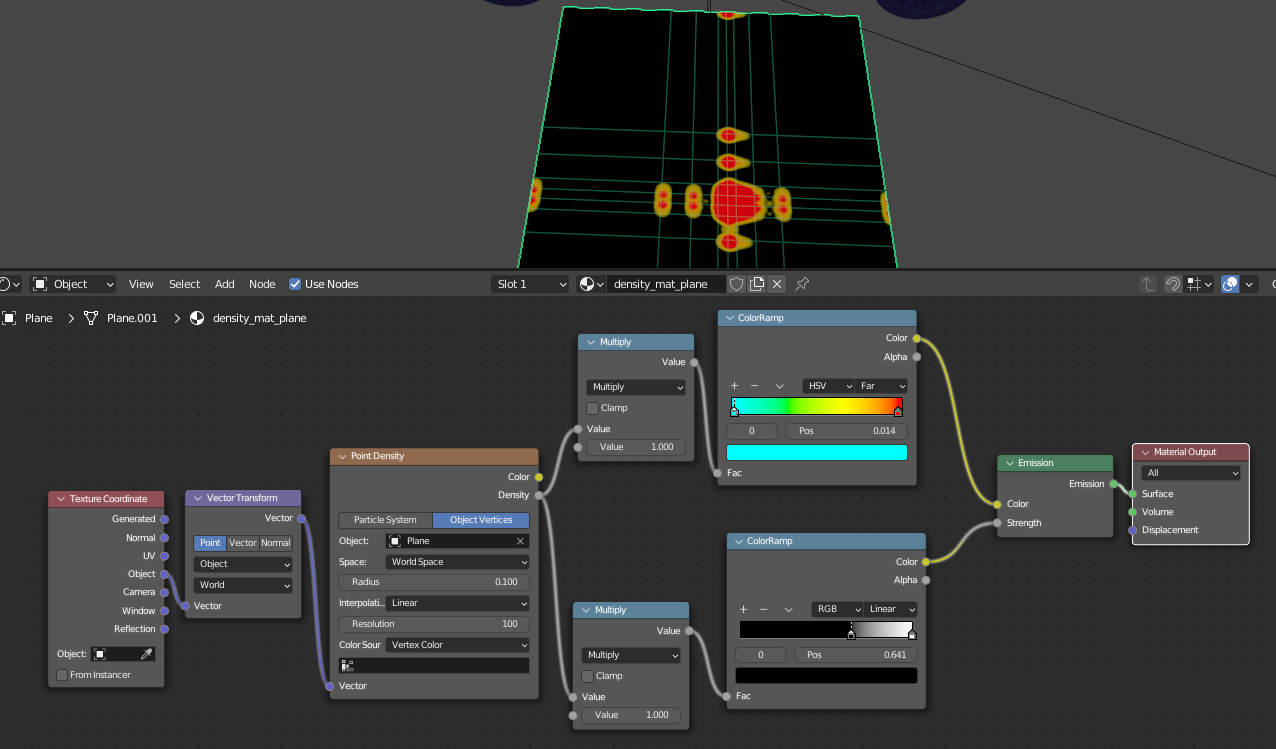
- basically, use point density node in material setup to show the point density info as color
- (first), go Render setting tab, change render from Eevee render to Cycle CPU render
- use object vertex as info to fit the object per material, and assign that material to that object
- radius is vertex search radius, which decide how the density amount calculated
- resolution is actual dot render, 100 is 100×100 pixel render for each dot. dont need so high res sharp dots, as they will blend together
Blender Material Concept
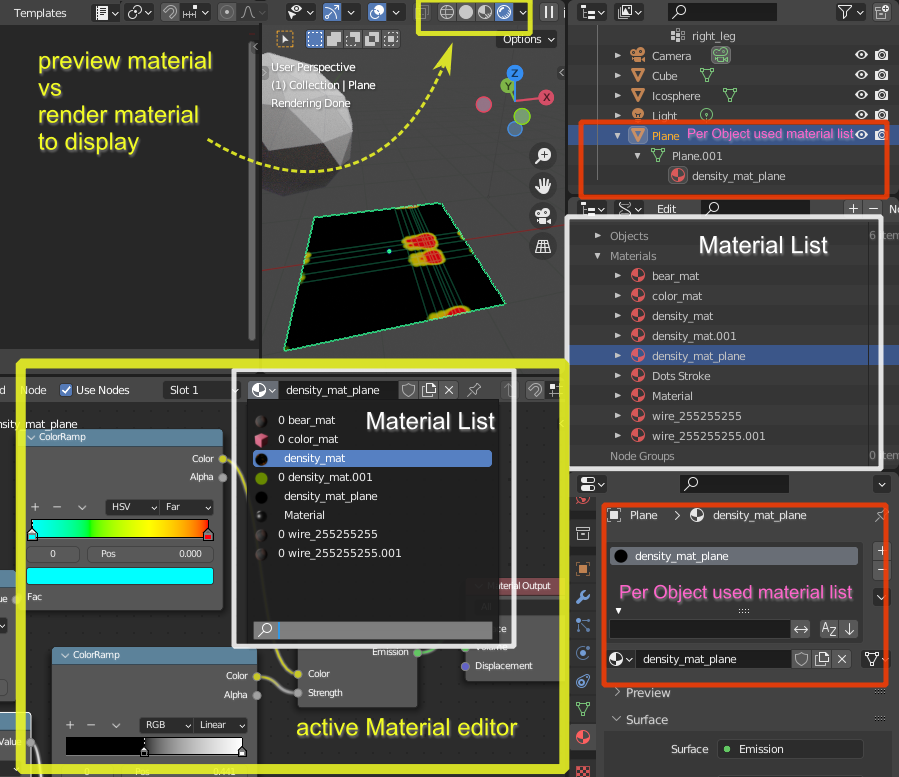
- You can view material list in > Outliner [data api view]
- You can check per object material usage case in > Outliner [scene view], expand the object arrow
- You can also check per object material usage case in > Material tab panel (object selection required)
- You can swith/edit object material in > Shader Editor (shift F3)
- object selection required
- if object is not assigned to any material, a New button is there instead
- In viewport, you can view material on object as result of (Preview material view) or (render material view)
- note, the (render material view) is linked to the > Render tab setting
- some material like Point Density can only be used in Cycle CPU render setting, so make sure Render tab is set properly for the render material view to work
- the default render preview is from Eevee GPU render.
Blender Material - create height map from 3d geo
ref:
- create height map from mesh
- bake texture
the reverse process:
- texture driven to mesh : https://www.youtube.com/watch?v=McALCOr39rY


